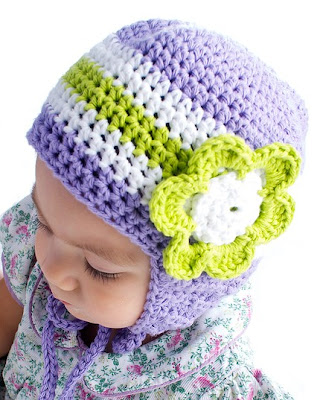
One of my favorite vintage patterns is from a beautiful Bernat Handicrafter booklet I picked up on Ebay. These Bernat booklets are filled with muted kodachrome colors and packed with classic designs, some of which are knit with a fairly chunky Bernat yarn. I wanted to knit up this wee Cap with Kitty Ears perfectly matched to the pale grey Zara Plus merino that was lonely in my stash. As I was knitting I came across many outdated terms and had to rip out my work about 3 times until I got it figured out. Once I got the pattern sorted it was really quick and easy to knit up and the yarn is so lovely and soft it makes the perfect quick baby gift. I wanted to share the pattern with you and so I have changed and updated it for modern knitters.
*I would love to see your versions of this cap so be sure to add photos of your finished cap to the Shescrafty Knits
flickr group
Cap With Kitty Ears
Materials
2 50g balls of Zara Plus extra fine merino in Shade 27
Tapestry Needle
One Button
Crochet Hook for making button loop
Needle Size
One pair US 5 (3.75mm) knitting needles.
One pair US 8 (5mm) knitting needles.
Gauge
5 stitches per inch
Abbreviations
Pretty standard abbreiviations with the exception of KRL = Knit Right Loop. Insert right needle into right loop of stitch just below next stitch; place it onto left needle and knit it; then knit the stitch on needle. For video help click
here.
Cap
Using US 5 (3.75mm) needles, CO 60 sts.
Work 8 rows in K1, P1 rib. Inc 1 st at end of last row. – 61 sts.
Change to 5mm (US 8) needles.
Row 1: K22, put a marker on needle, P1, K1 in moss stitch for 17 sts and put a marker on needle, K22 sts.
Row 2: P22, work next 17 sts in moss st, P22 sts. Keeping the 17 sts between markers in moss st and remaining sts in stocking stitch, work evenly until piece measures 2 ½ inches, ending with a WS row
Shape Ears
KRL = insert right needle into right loop of stitch just below next stitch; place it onto left needle and knit it; then knit the stitch on needle. For video help click here.
Row 1: knit to first stitch before next marker, KRL, k1, KRL, p1, work in moss stitch to 1 st before next marker, p1 tbl of next st in row below, k1, KRL, k1, k to end of row. – 1 st increased on each side of both markers.(move stitch markers to keep 17 sts moss stitch in center.
Row: P 24, work center 17 sts in moss st, P 24.
NOTE: all increases are made by knitting through back of loop of next st in row below, being sure to keep all increased sts in stocking st.
Row 3: *K to 1st st before next marker, inc 1 st on each side of marker, k1, work center 17 sts in moss stitch, inc one stitch on each side of next marker, k to end of row.
Row 4: P 26, work center 17 stitches in moss stitch, P26.
Keeping the center 17 sts in moss stitch and rem sts in st st, cont to inc 1 st on each side of each marker on every other row 8 times more, ending with a WS row.
Shape Back
At the beginning of each of the next 2 rows BO 42 sts. Continue in moss st on rem 17 sts until piece is same length as bound off edges. BO.
Neck Band
Using US 5 (3.75mm) needles, CO 15 sts for chin strap. On same needle with RSF, pick up 58 sts around lower edge of cap. K1, P1 in ribbing for 1 inch. BO.
Finishing
Sew back seams. Crochet a button loop at the end of chin strap. Sew button on chinstrap.